DAY 3- 9
JULY 2012
Assalamualaikum
and Salam Sejahtera..
My task
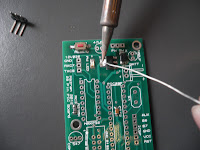
for today is continue with soldering process. The first thing I need to do is
to soldered an SMD component first. Before starts to soldering process, we must
know the procedure of surface mount components. A good eye, a steady hand and a
soldering iron with a small, clean tip are required. We are using pin by pin
method. This method are used for two pin components such as capacitor and
resistor,small outline package and SOT
SMD
Components Soldering procedure
1)Place
a small amount of solder on one of the two pads. Approximately 0.5mm in height.
2) Grab the part with very fine tweezers. Bring the part overtop of the pads, slight to one side so that the part can sit flat against the PCB. Heat the pad already with solder and slide the part onto the pad so that it is centered between the pads. Remove heat.
3) Put a small force down on the
part and re-heat the one pad to guarantee that the parts is flat against the
PCB
4) \Solder the other side of the part
5) The solderings should not look like "round ball" on either side of the parts. If this is the cast, there is too much solder being appied to the joint. A properly soldered joint should have a curved line from the end of the pad to the top of the part.
 |
SMD components that has been soldered
Through
Hole Component Soldering Procedure
1)After we prepare all components that
we need to use for solder, we need to clean component lead and make sure it’s
clean from dirt & smear.
2)Then we can insert the component and
clinch lead. We need to cut off the excess wire first before we continued with
soldering process
3) Next, we need to apply flux to
soldering point. The purpose of applying flux to soldering point is to remove
oxide layer from the base metal surface, to shield base metal surface from
oxygen which re-oxidizemetal and to lower solder’s surface tension to improve
wetting
4)Before soldering, we need to make
sure that we are using only well-heated soldering iron. Clean soldering iron
tip and then apply a bit of solder to iron tip. We need to ensure that solder
are attached to tip.
5)In order to solder the point, we
need to heat the soldering point first and soldering iron must contact both
component lead and pcb copper.
6)Then apply solder wire and ensure
that solder wire must contact both component lead and pcb copper.
7)Pull away soldering wire from solder
point. Then pull away soldering iron from solder point when solder becomes
shiny.
8) During soldering process, the timing
is important. Do not apply soldering iron too long or too short.
Complete
ACCEPTANCE CRITERIA OF SOLDERING
There is a criteria of good soldering that have been set
up base on IPC-A-610 and J-STD-001 (Class 2)
Criteria:
• Circumferential
fillet and wetting= 270°
• Percentage of
PCB copper landarea covered with solder = 75%
• Visible good
wetting
• Fillet Height
= minimum ¼ Leadheight or 0.05mm
• Lead height
after cut =maximum 2.5mm
• Solder finish
= glossy or shinny
• Solder contact angle ≤90°
|
1


No comments:
Post a Comment